|

Progressive Scan / IVTC Xbox/Xbox 360 Guide (NTSC TV SYSTEMSONLY) Some Notes before You Begin | 1. | ThisGuide is Intended for NTSC TV Systems. | | 2. | The(User Preference) Notes on the Settings Tabs are Meant for people who knowwhat they are doing | | 3. | If You Dont Know How to Capture Video See the Recording Xbox Guide HERE (this Guide also shows how to encode the new AVI to WMV) | What is this IVTC? IVTC means InVerse TeleCine. IVTC is the technique used to reversethe telecine process. Telecining is the conversion of 24fps (NTSC) film videointo 30fps (NTSC) video for broadcast. Inverse telecine is the reversal of thatprocess from 30fps broadcast video to 24fps. Thus Eliminating the Need forDe-Interlacing. Which In return Eliminates Interlaced Artifacts as well asCommon Stretch or Ghosting Anomalies that co-exist with De-interlacing Methods. Benefits of IVTC: | 1. | No Interlace or De-Interlacing Side Effects | | 2. | More Bits Per Pixel | Non-Benefits: | 1. | Takes a lot More time, Not The Encoding ProcessBut the Frame Tagging, Since you Go Frame By Frame through the Video | | 2. | NotAll Videos Are I.V.T.C.-Able Due to Mass Cross fades and Special FX. (or PAL to NTSC Conversions) | Necessary Tools
You need: Tsunami Encoder [www.tmpeg.com] Please Note: there is somesoftware that "supposedly" can do IVTC Automatically, But it Only Uses the First fewSeconds to Make a Frame Pattern so if your Video Pattern Changes it chooses thewrong frame. (or if you drop frames when your encoding), Also Tsunami encoderhas an "Auto IVTC". This automated IVTC scans your video by theframes Flicker values And you can review the Video and Make Changes as Needed InverseTelecine the Video FirstGo to the Settings Menu and Check then Double Click the Inverse Telecine Line. 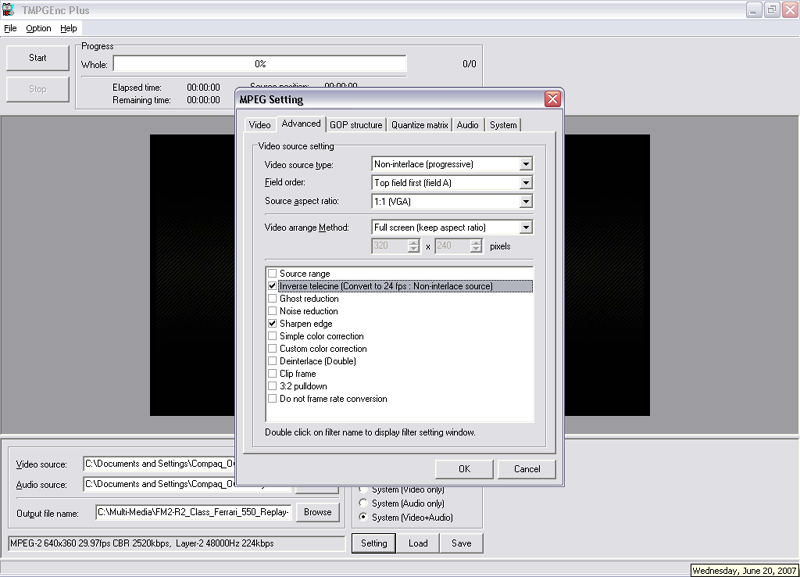
Which Will bring Up this Menu: 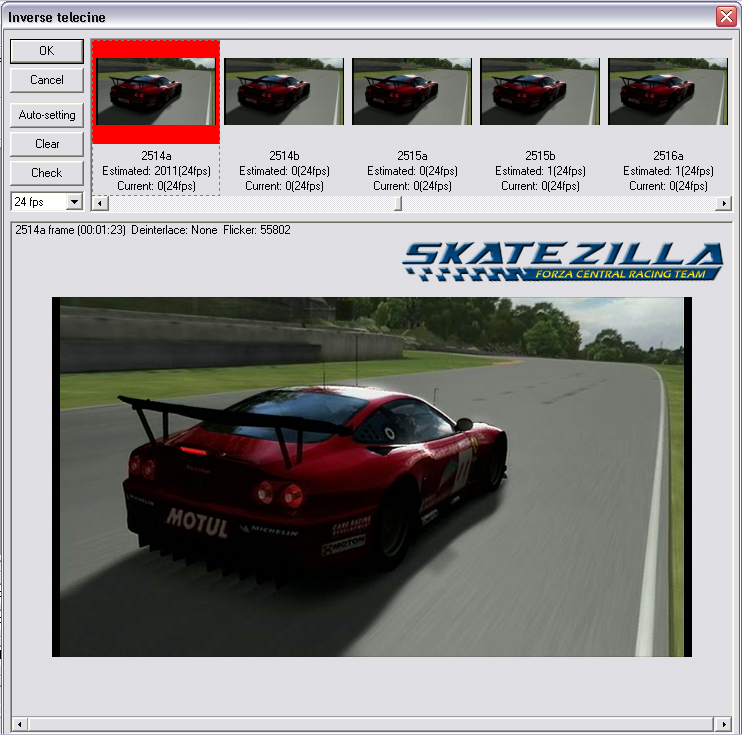
-Press the Clear button. Thiswill reset any previous IVTC settings. -Click The Drop Down Menu Under the "Check" Button, and Choose "30 fps" -Scroll Right Using the LowerArrow.. Youll Notice You Have Some Progressive And Some Interlaced VideoFrames: Examples, the Progressive frame isOn the Top and the Interlaced frame is on the bottom.
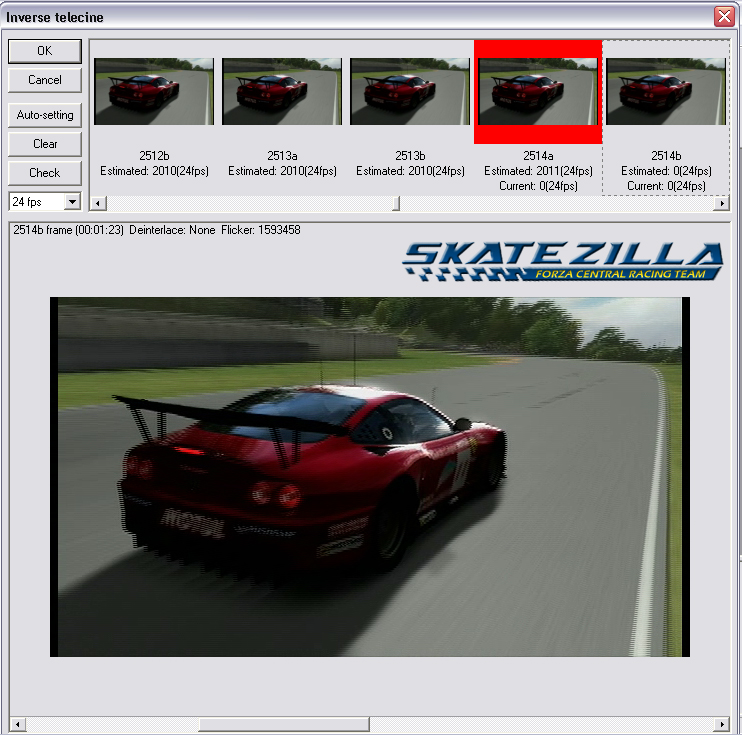
First Notice the Lines From theMotion On the spoiler, car and background/track in the Top Frame. And the Lower Frame does not exhibit these effects. Now that You Know whatProgressive and Interlaced Look like. Now You Have to Find the Frame Sequence. Most Videos Use Frame Sequenceof 101010 If rendered in 30 frames/sec (ie Forza Motorsport 2 Replay)(1=Progressiveand 0=Interlaced), Find the First Progressive Frameand Left Click to High Light it, If It Is Progressive, Right Clickon the First Frame and Choose Deal After this Frame According to SelectedPattern 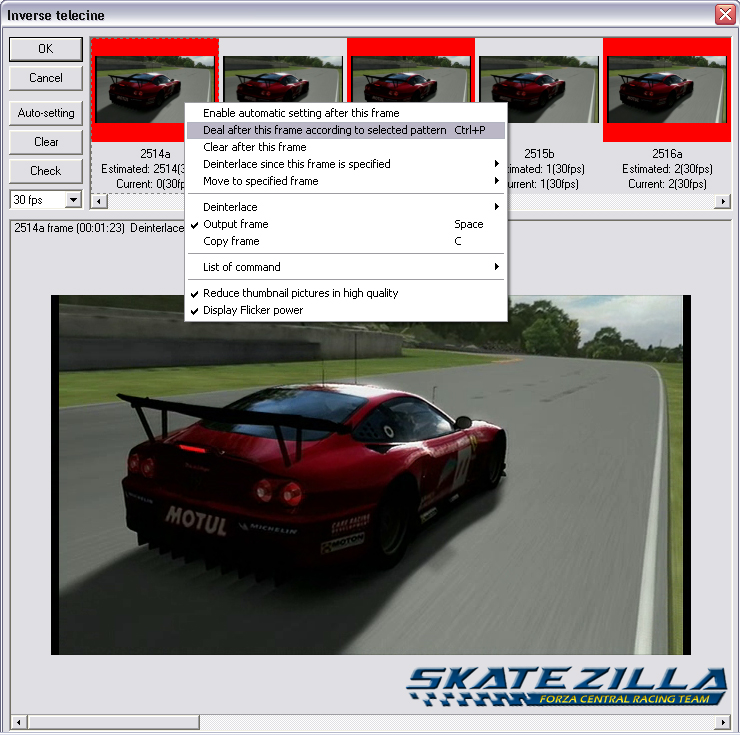
Which Brings Up this Little Box. 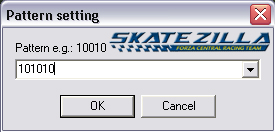
Enter the Pattern Into the Boxand Click OK (again 1= Progressive [frames you want to keep] and 0=Interlace[frames you want to discard] After You Enter the Pattern.Using the Lower Right Arrow Scroll Forward frame By Frame and Check to ensurethey are progressive. Keep Scrolling until you hit aInterlaced Frame, which is either a scene change (or camera angle change) or where you dropped a frameduring capturing. After You Get to the nextInterlaced Frame Go Forward Until You Find the Next Progressive Frame (Which isusually right after) and Highlight that One and Right Click and Deal thePattern Again. (Again usually 101010 for 30 Frames/Sec Games) (this will not affect theframes you already set Prior to the Interlaced Frame. Keep Repeating All the Waythrough the Video, depending on the video you may only have to set the framepattern once, twice or Up to 30 times. Also Every Few Scenes Hit theCheck Button to Make Sure Your Audio And Video Is Synced. If It Loses Sync itwill take you to the frame where it occurs. And to fix it look at the Bottom ofthe From on the Top Bar and it will say Estimated and Current If Current IsHigher than Estimated De-Select that frame and check again. If Current is lowerthan Estimated Go Back a few frames and Select some more Progressive Frames andcheck again. After You Set the Frames Clickthe OK Button On the Top Left of the IVTC main Setting Box and You Drop Back tothe main Settings Windows Of Tsunami, There are a few Settings You Haveto Ensure Are Set In Tsunami Before Exporting the New AVI and WAV Files or the Video Wont Encode or Play Back Correctly. -Under Video Tab, Stream type to "MPEG-2 Video" (Even though we wont be using MPEG-2), Change Size to 640x360 (640x480 If you recorded in Full Screen Mode), Aspect Ratio to "1:1 VGA" (Will Explain Later), FPS to "29.97", Rate Control Mode to "Constant Bit rate", Bit rate to "3000Kbits", Profile to "Main Profile - Main Level", Video Format to "NTSC", Encode Mode "Non Interlace", YUV Mode to "4:2:0", DC Component Precision to "10 Bits", Motion Search Precision to "Highest Quality" -Under Advanced Tab, Video Source Type To "Interlaced", Field Order "Top Field First", Source Aspect Ratio "16:9" (Again I'll Explain Later), Video Arrange Method to "Full Screen (Keep Aspect Ratio)", Ok, Check the "De-Interlace" Box, Double Click it, Choose "Even Field (Adaptation)" for the Method, Click OK, the Box should remained checked and list the method next to it, -Under GOP Structure Tab, Set I Picture to "1", P Picture to "5", B Picture to "2", Output Interval to "0" (Thats Zero), Check The "Detect Scene Change" Box, Make Sure "Output Bitstream" and "Force Picture Type" Box is unchecked. -Under Quantize Matrix Tab, Choose "MPEG Standard" from the Drop down menu, Check "Use Floating Point DCT" Box, Make Sure "output YUV", "No Motion Search for Still" and "Soften Block noise" boxes are Unchecked. -Under Audio Tab, Set Stream Type To "MPEG-1 Layer 2", Sample Freq. to "44100 KHz" (or 48000 KHz if using SPDIF), Channel Mode to "Stereo", Bitrate to "224 kb/sec", Uncheck All the Boxes below it, Set De-Emphasis to "None", Make Sure "Audio Edit' box is unchecked. -System Tab, Set Stream type To, "MPEG-2 Program (VBR)", Make sure "Inserts Comment" box is unchecked. -Ok, Click OK to get back to the main screen, click "SAVE" enter a file name (this will save your settings), though loading a new video will reset the image sizes again. Ok, Option Menu, Preview Option, Put Checks next to "Show All Frames" and "Fix To optional Size" A Size Setting Box will pop up, enter "640x360" and press OK (640x480 If You Recorded In Full Screen Mode) Now, Time to Export the MJPEG (or Huffy) AVI to a UNCOMPRESSED AVI (warning file sizes will be upwards of 1 to 1.5 GB per Minute) Goto FILE, Output File, "WAV FILE", enter a New File Name, Under Settings Make Sure Format is "PCM", and Frequency is 44.1 KHz (or 48 if you used SPDIF input), Click SAVE, and It will Save the AUDIO as a Separate WAV File, and We'll Convert this Later. Goto File Again, Output File, "AVI File", enter a new file name, Under Settings Make Sure Compression is set to "No Compression (RGB24), and Also Make Sure "Audio" Box is Unchecked (we only want to save the VIDEO Stream), Click ok, and this process make take a Few minutes, and the Video Preview windows will show your frame progress. Ok, Now that You have a RAW AVI File, and a Raw WAV File, We Need to Convert the WAV to An MP3, (some reason Windows Media Encoder is touchy and dont like wavs, so, Use CoolEdit or Whatever conversion tool you have to convert to the WAV to a MP3. I know Cool Edit MP3's Work in WMEncoder, I'm not sure if other programs work though. |

